Dealing with email issues can be a frustrating experience. Whether you’re not receiving important WordPress notifications or your contact form seems to be acting up, these problems can disrupt your day-to-day business.
WordPress usually fails to send email because it relies on PHP’s mail() function, which many hosting servers don’t support, and unauthenticated messages get filtered as spam. The fix: send your site’s mail through an authenticated SMTP server using a plugin such as WP Mail SMTP, then add SPF, DKIM, and DMARC records so mailbox providers trust your domain.
In this article, we’ll explain some likely reasons WordPress isn’t sending emails. Then we’ll show you how to fix this issue and configure your contact forms so that they properly deliver emails as well. Let’s go!

Need to Fix WordPress Issues? We’ve Got You
Avoid troubleshooting when you partner with DreamHost. Our friendly WordPress experts are available 24/7 to help solve website problems, big or small.
Check Out PlansWhy You’re Not Receiving Emails From WordPress
By default, WordPress uses the PHP mail() function to send emails. Unfortunately, many hosting servers are not configured to use this function, making it impossible to process those emails.
Another reason emails from your site may not get delivered is unintended side effects from efforts to reduce spam. Most email providers attempt to verify that an email is coming from the address it claims.
However, the address used to send email from your website likely uses spoofing. Without spoofing, an email sent from your website might look like “admin@yourserver.yourwebhost.com”. Spoofing enables you to change that address to a more reasonable one, such as “admin@yourwebsite.com”.
Unfortunately, spoofing can also serve nefarious purposes, and without authentication, email providers can’t tell the difference. Mailbox providers check three DNS records — SPF, DKIM, and DMARC — to decide whether to trust a message, and mail sent through PHP’s mail() function typically carries none of them. We’ll show you how to add those records below. Therefore, it can sometimes cause your emails to end up in recipients’ spam folders.
How to Stop Email From Going to Spam
In addition to spoofing, there are a lot of other reasons why emails might go to spam. Some of the most common possibilities are:
- Your IP address is flagged as having been used for spam
- You’re using trigger words in your email newsletters
- You’re employing poor emailing practices
A flagged IP address is easy to check: look up your server’s sending IP with a blocklist checker such as MXToolbox. If it shows up on a list, request delisting through that blocklist’s own process, ask your host to investigate, or switch to a reputable SMTP or transactional email service that sends from its own well-maintained IPs.
One way to keep your emails out of the spam bin is to use Simple Mail Transfer Protocol (SMTP) rather than PHP mail(). This protocol is the industry standard and uses proper authentication.
Put simply, emails sent via authenticated SMTP have a higher chance of being delivered than those sent with PHP’s mail() function. You can use a few different methods to set up your WordPress site to send emails via SMTP.
Add SPF, DKIM, and DMARC Records to Your Domain
SMTP gets your mail sent; SPF, DKIM, and DMARC get it believed. These three DNS records are how mailbox providers verify that a message really comes from your domain. They’re no longer optional. Google’s Email sender guidelines have required SPF or DKIM from every sender to Gmail accounts since February 1, 2024, and warn that unauthenticated messages “might be marked as spam or rejected.” Senders of 5,000 or more messages per day need all three.
Here’s what each record does, in plain language:
- SPF lists the mail servers allowed to send email for your domain; anything else looks forged.
- DKIM adds a cryptographic signature to each message so receiving servers can confirm it wasn’t altered and really came from your domain.
- DMARC tells providers what to do with mail that fails those checks (deliver, quarantine, or reject) and sends you reports.
Mail sent through PHP’s mail() function typically carries none of these, which is a big part of why it gets junked. You add all three as DNS records wherever your domain’s DNS is managed, but the values themselves come from whichever service actually sends your mail: DreamHost if you send through DreamHost’s SMTP servers, Google if you send through Gmail or Google Workspace, or your transactional email service if you use one. Records copied from a provider you don’t send through won’t pass verification. If DreamHost sends your mail, DreamHost’s help docs walk through each one: adding an SPF record, DKIM records, and creating a DMARC policy.
To verify your setup, send a message to a Gmail address you own, open it, and choose Show original. You should see “PASS” next to SPF, DKIM, and DMARC.
Before You Start: Confirm What’s Actually Failing
Before you change any settings, take 2 minutes to confirm the problem. You may not need the full fix at all.
First, check your admin email address. In your WordPress dashboard, go to Settings > General and look at the Administration Email Address field. A simple typo here, or an address on a domain that isn’t yours, is enough to break notifications. While you’re at it, confirm the From address in your contact form plugin matches your website’s domain.
Next, send a test email. The WP Mail SMTP plugin we use throughout this guide includes a built-in email test — send a message to an address you control, then check both the inbox and the spam folder. If the test fails, the error it returns tells you where to look. If it lands in spam, your emails are sending but failing trust checks. Missing authentication is the most common cause, so start with the SPF, DKIM, and DMARC records above.
How to Set Up WordPress to Send Emails Via SMTP (3 Ways)
Now that we’ve touched on a few reasons WordPress emails aren’t making it to their intended recipients, let’s look at three ways to fix the problem.
1. Send Email Using Your DreamHost SMTP Settings (WP Mail SMTP)
Using your hosting account email is the simplest way to get your WordPress messages moving as expected. We’ll show you how to set this up, using our own DreamHost web hosting as an example.
Begin by downloading and installing the WP Mail SMTP plugin. From your WordPress dashboard, navigate to WP Mail SMTP > Settings.
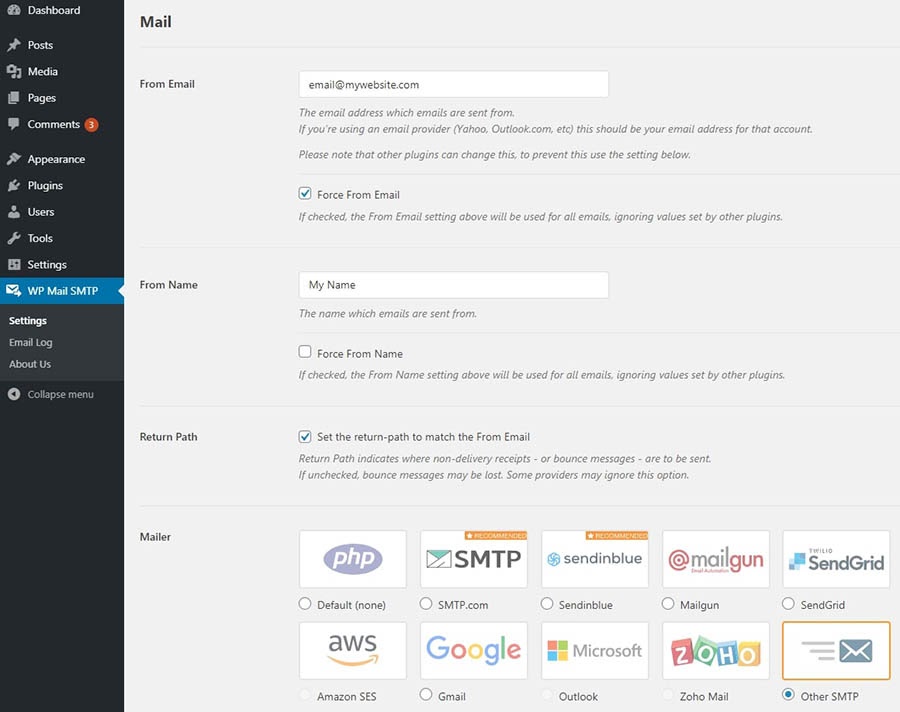
There are several fields you’ll need to fill in on this screen. From Email is the address from which you want your emails sent. You’ll also need to check the Force From Email box. The From Name field is the name you’d like the email to come from. You can check the Force From Name box if you’d like.
Finally, select Other SMTP as your mailer. Doing this will cause a Return Path section to appear. Be sure to click on the box in that section as well.
Now you can populate the other SMTP options. We’ll use DreamHost to demonstrate again, but the information should be similar if you use another web host.
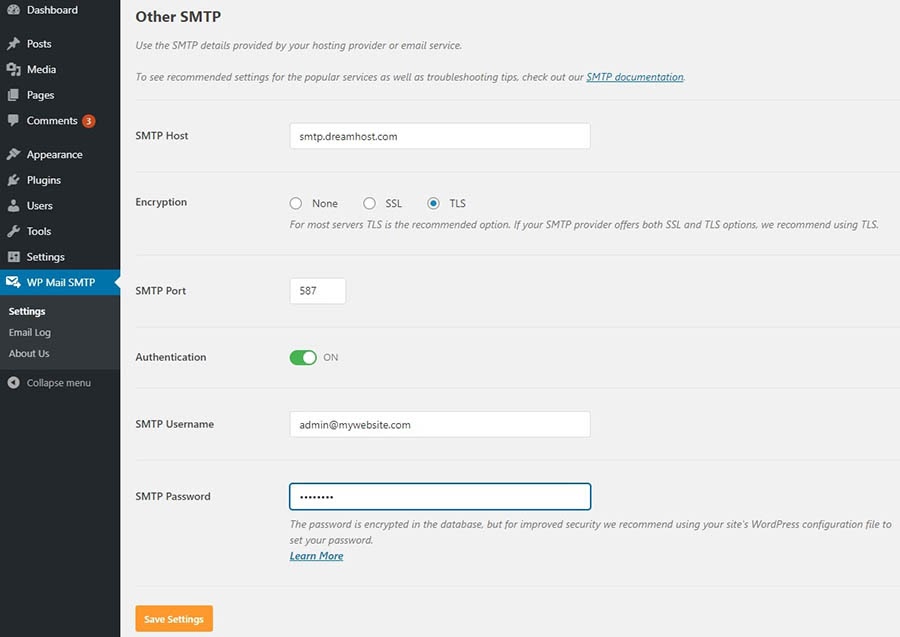
First, make sure to toggle on Authentication. For the SMTP Host, use “smtp.dreamhost.com”. When you select TLS encryption, the plugin should auto-populate the SMTP port as “587”.
Next, you can enter your DreamHost email address and password. Finally, click on the Save Settings button, and you should be ready to go. You can try sending a test email to be sure that everything is working properly. All current DreamHost SMTP values are listed in DreamHost’s email client configuration overview if you want to double-check them.
2. Send Email Using Your Gmail or Google Workspace Account
If you prefer, you can send your site’s mail through a Gmail or Google Workspace account. This method also uses the WP Mail SMTP plugin, but it’s significantly more involved: you’ll create your own app in Google Cloud Console so WordPress has authorized access to Google’s API. Per WP Mail SMTP’s setup guide, the manual route takes roughly 30–60 minutes, and you’ll have to repeat it if you ever switch Google accounts.
There is a shortcut: WP Mail SMTP Pro includes a One-Click Setup for the Google Workspace / Gmail mailer that connects your site in under 2 minutes, with no manual configuration. If you’d rather never open Google Cloud Console, that’s the route to take.
For the manual setup, start in the plugin. Navigate to WP Mail SMTP > Settings, fill out the From Email and From Name fields as described above, and select Google / Gmail as your mailer. A new Google / Gmail section will appear — keep this tab open, since you’ll paste two values into it shortly.
In a new tab, log in to your Google account and open the Google Cloud Console. Click the project drop-down in the top toolbar, select New Project, give the project any name you’d like, and click Create.
Next, enable the Gmail API. In the console’s sidebar, go to APIs & Services > Library, then find the Gmail API under the Google Workspace category (or simply search for it) and click Enable.
Before Google will issue credentials, it asks you to configure an OAuth consent screen. Choose External unless your organization uses Google Workspace, then enter an app name and your contact email address. You can click Save and Continue through the remaining prompts — you’re the only person who will ever see this screen.
Now create the credentials. Go to APIs & Services > Credentials, click Create Credentials > OAuth client ID, and choose Web application as the application type. Switch back to your WP Mail SMTP tab, copy the Authorized Redirect URI shown there, paste it into the Authorized redirect URIs field in Google Cloud Console, and click Create.
Google will display your Client ID and Client Secret. Paste both into the matching fields in the WP Mail SMTP settings and click Save Settings. When the page refreshes, click Allow plugin to send emails using your Gmail account and sign in to grant permission.
Two final steps: if Google created your app with a Testing publishing status, switch it to production (WP Mail SMTP’s Google Workspace / Gmail documentation covers that step, and every screen above, in click-by-click detail). Then send a test email to confirm the connection is working.
3. Send Email Using a Transactional Email Service
If your site sends more than the occasional notification — order receipts, password resets, or anything at volume — a dedicated transactional email service is the sturdiest option. Services like SendLayer, SMTP.com, Brevo, Mailgun, and Amazon SES exist solely to deliver application email from authenticated, well-maintained infrastructure.
WP Mail SMTP includes built-in mailers for these providers (SendLayer is its top recommendation), and because those integrations use each provider’s direct API, your mail still goes out even if your host blocks SMTP ports. Most offer free tiers to start: Brevo, for example, includes 300 free emails per day, per the WP Mail SMTP plugin page. Setup is usually just an account, a couple of DNS records to verify your domain, and an API key pasted into the plugin.
Which Sending Method Should You Pick?
Here’s the short version:
| Method | Best for | Limits and cost | Setup effort |
|---|---|---|---|
| DreamHost SMTP | Contact forms and site notifications on a DreamHost-hosted site | Included with your hosting email | About 5 minutes |
| Gmail / Google Workspace | Sites that should send from an address you already use in Gmail | Free, but daily sending caps apply | 30–60 minutes manually; under 2 minutes with Pro One-Click Setup |
| Transactional email service | Stores and higher-volume senders | Free tiers to start, paid as volume grows | About 15 minutes |
Our recommendation: start with your hosting account’s SMTP. It’s the fastest fix and covers most sites. Move to a transactional service when you run a store or your volume grows — Gmail caps sending at 500 messages per day on standard accounts and 2,000 on Google Workspace, per Google — and pick the Google method only if you specifically want mail to come from an address you already manage in Gmail.
How to Configure Your Contact Forms to Send Email Successfully
If your server is now sending emails correctly, but you are still having problems with your contact forms, the issue could be with a setting in the WordPress form plugin you use. Below, we’ll show you how to troubleshoot some of the most popular tools. It’s also worth ruling out a plugin conflict first: security, spam-prevention, and overlapping mail plugins can interfere with sending. Deactivate likely suspects one at a time, retest after each change, and review any error logs those plugins keep.
Contact Form 7
If Contact Form 7 isn’t working for you, you likely need to change the address from which emails are sent. Starting from the admin dashboard, navigate to Contact > Contact Forms. Next, click on the contact form you’d like to edit and select the Mail tab.
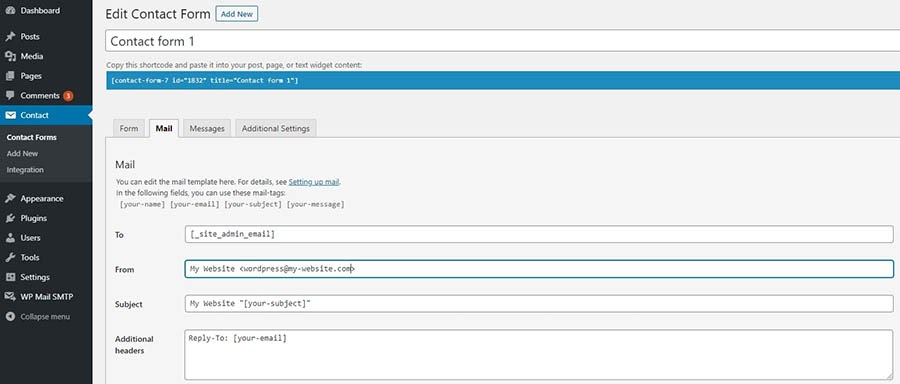
Ensure that the From field uses an email address that belongs to the same domain as your website — otherwise, Contact Form 7 flags a configuration error, per Contact Form 7’s mail setup documentation. The To field simply needs a valid address where you want to receive submissions. Once you’ve made the necessary changes, click on the Save button.
WPForms Lite
You can change the settings in WPForms Lite by navigating to WPForms > All Forms. To open the editor, click on Edit under the form you want to change. Next, select Settings in the left-hand menu, followed by Notifications.
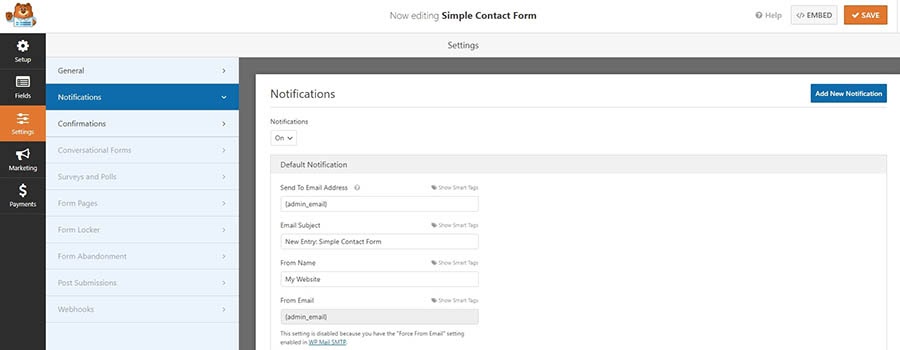
Here, you’ll be able to update the Send To Email Address and From Email fields. Click on the Save button when you’ve made your desired changes.
Jetpack
You’re less likely to run into problems using Jetpack’s contact form, as this plugin doesn’t give you as many configuration options. If there is an issue, it probably stems from having the same email address set as both To and From.
You can correct this by making one simple change. After you’ve added the form, select it and open the Block settings in the right sidebar, then open the Form notifications tab.
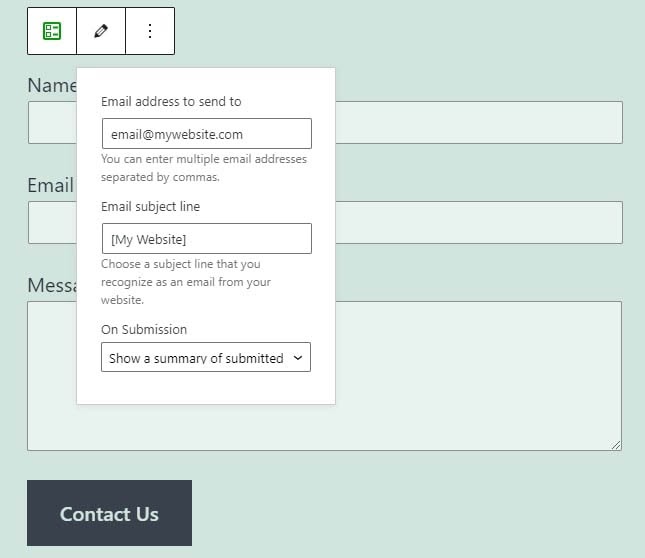
You can change the email address your form responses send to under the Email setting in that tab, per Jetpack’s Form block documentation.
Common SMTP Rejection Errors (And What They Mean)
Sometimes the mail server tells you exactly what’s wrong, often in the form of a bounce message. Here are the rejections we see most often:
- “550 #5.7.1 Your access to submit messages to this e-mail system has been rejected” — the outgoing message was rejected as a suspected spam or sender-policy violation before it left the server. Check that your From address uses your own domain and that your SPF and DKIM records are in place. DreamHost’s sender domain policy FAQs explain how rejected messages are handled and where to find them on your server.
- Relaying or authentication errors — if a bounce mentions “relaying” or authentication, double-check your outgoing connection settings: the hostname should be smtp.dreamhost.com with port 587, your full email address as the username, and authentication enabled, per DreamHost’s email client configuration overview.
- A legitimate message bounced as spam — false positives happen. You can mark a bounced outgoing email as “Not Spam” in the MailChannels dashboard or report it to DreamHost, per DreamHost’s guide to reporting false-positive spam.
FAQs About WordPress Not Sending Emails
What does “550 #5.7.1 your access to submit messages to this e-mail system has been rejected” mean?
The mail server refused your outgoing message as a suspected spam or sender-policy violation. Verify that your From address uses your own domain and that your SPF and DKIM records are set, then see DreamHost’s sender domain policy FAQs for how rejected messages are handled.
Why is my DreamHost email not sending or receiving?
It’s usually a configuration issue. DreamHost’s outgoing server is smtp.dreamhost.com on port 587, with your full email address as the username. Compare every value against DreamHost’s email client configuration overview. If the settings check out, look for a bounce message — it names the actual cause.
How do I test whether WordPress is sending email?
Send yourself a test message. The WP Mail SMTP plugin includes a built-in email test: send it to an address you control and check both the inbox and the spam folder. If the test fails, the returned error identifies the problem; if it lands in spam, fix your domain authentication.
Why do my WordPress emails go to spam?
Because they aren’t authenticated. Google requires SPF or DKIM from every sender to Gmail accounts, and unauthenticated mail “might be marked as spam or rejected,” per its Email sender guidelines. Send through SMTP and add SPF, DKIM, and DMARC records to your domain.
More WordPress Error Guides
Want to learn how to fix other common WordPress errors? We’ve put together several tutorials to help you.
- How to Fix the 500 Internal Server Error in WordPress
- How to Fix Syntax Errors in WordPress
- How to Fix the Error Establishing Database Connection in WordPress
- How to Fix WordPress Error 404 Not Found
- How to Fix the Sidebar Below Content Error in WordPress (In 3 Steps)
Ready to Fix the WordPress Not Sending Email Issue?
There are few things as irritating as having to dig through your spam folder to look for a missing email. However, once you’ve fixed this common WordPress issue, your website’s emails should safely find their way to their intended destinations.
In this piece, we showed you how to set up the WP Mail SMTP plugin, and use your hosting account, a Google account, or a transactional email service to send emails. Once you’ve handled that task, you can move on to configuring the options in your contact form plugin, to ensure that those emails properly send as well.
If you’d like to make your experience with WordPress emails easier, you might want to consider checking out DreamPress, our managed hosting plan. You’ll get 24/7 support from in-house WordPress experts to help with any problems you run into on your site!