To create a menu in WordPress, go to Appearance > Editor and edit the Navigation block if you’re using a block theme, or head to Appearance > Menus (or the Customizer) on a classic theme. Below, we’ll walk through both paths in three steps: create the menu, add your items, and organize its structure. It’s worth doing well: menus provide the fastest way for your users to find your content and navigate your site, so poorly organized or unwieldy menus can be detrimental to your UX and, in turn, damage your search engine rankings.
Fortunately, WordPress includes a menu editing system that’s easy for all users to grasp. For instance, you can select the location of your menu and the pages you want to display. The location can vary depending on your theme, although most WordPress themes include several options.
What is a WordPress menu?
A WordPress menu is a set of links — usually to your pages, posts, categories, or custom URLs — displayed in a navigation area of your site, such as the header or footer. Menus show visitors what your site contains, help them move between its sections, and can include submenus (dropdowns) that group related pages together.
Menus are navigational tools that enable your users to find content on your site. This makes them essential to your site’s overall organization and user experience:
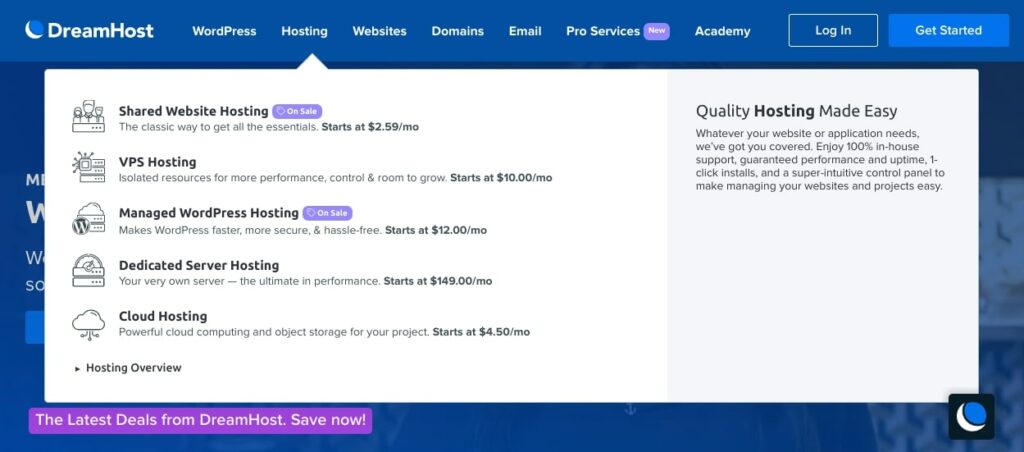
For example, if a reader discovers your site through a search engine, they may not always land on your home page. To learn more about your site, they will need to know how to explore your other content. Out of habit, they will look for your menus to get a feel for what else there is to explore.
WordPress menus can improve your site’s Search Engine Optimization (SEO). Search engines reward relevant content, so making sure your menus are clear can help increase your rankings.
There are a few other ways that menus can boost your SEO, such as:
- Improved UX: If your readers have a pleasant UX, they are likely to spend more time on your site. This means lower bounce rates for you.
- Sitelinks for Search Engine Results Pages (SERPs): Search engine results will display the main page and links to internal pages if the site and its navigation are well organized.
- Easier crawling by search engines: Search engines use bots to crawl through your site and index your pages. Having well-organized navigation that clearly shows what content is available for each menu topic makes it easier for bots to find and index your content.
The key is to have well-organized menus in a prominent location. While the perks of better SEO are awesome, menus also make it easy for your readers to find the content you’ve crafted for them.
How to plan your menu
Before you build anything, decide what actually belongs in the menu. A few guidelines we recommend:
- Keep the header menu short. Aim for around five to seven top-level items. If you need more, group related pages under a dropdown instead of adding another item.
- Put your most important pages in the header. The pages you most want visitors to reach (services, products, contact) belong in the main menu. Legal pages, careers, and other low-priority links can live in the footer.
- Use short, descriptive labels. “Pricing” beats “See What It Costs.” Visitors (and search engines) should know where a link leads before they click it.
- Check the mobile view. Many themes collapse the menu into a hamburger icon on small screens, so preview your site on a phone to make sure every item and submenu is still reachable.
How to create a menu in WordPress (in 3 steps)
In WordPress, menus are an inherent element. Additionally, many themes come with predefined menus and locations.
However, it is also important for you to understand the best way to incorporate menus on your site. We recommend you create a sitemap (or at least a navigational strategy) before you start adding menus to your site.
The exact steps depend on your theme type, so check which one you have first. In your dashboard, open Appearance. If you see Editor, you’re using a block theme (every default WordPress theme since Twenty Twenty-Two is one), and you’ll build your menu with the Navigation block. If you see Customize and Menus, you’re on a classic theme, and the three Customizer steps below are for you.
Create a menu with the Site Editor (block themes)
Block themes don’t include the Customize screen. Instead, you design everything, menus included, in the Site Editor. The process still boils down to three steps:
- Open your menu. Go to Appearance > Editor and select Navigation to browse your menus, or open your header template and click the Navigation block directly. If the menu appears as a single Page List block, click Edit to convert it into individual links you can manage one by one.
- Add your items. Click the + icon inside the Navigation block to add a link. You can search for existing pages and posts, paste any URL as a custom link, or create a new draft page on the spot. Press Enter after each item to add the next one.
- Organize and save. Drag items into place using the List View to reorder them. To build a dropdown menu, select a parent item and click Add submenu in its toolbar, then add the child links. When everything looks right, click Save. Since the header is a shared template part, your new menu will appear across your site.
On a classic theme, you’ll use the Customizer instead. Here’s that process, step by step.
Step 1: Create a New Menu in WordPress
Once you’ve made a navigational plan or sitemap, you’re ready to create your menus. Within WordPress, navigate to Appearance > Customize, then click on Menus:
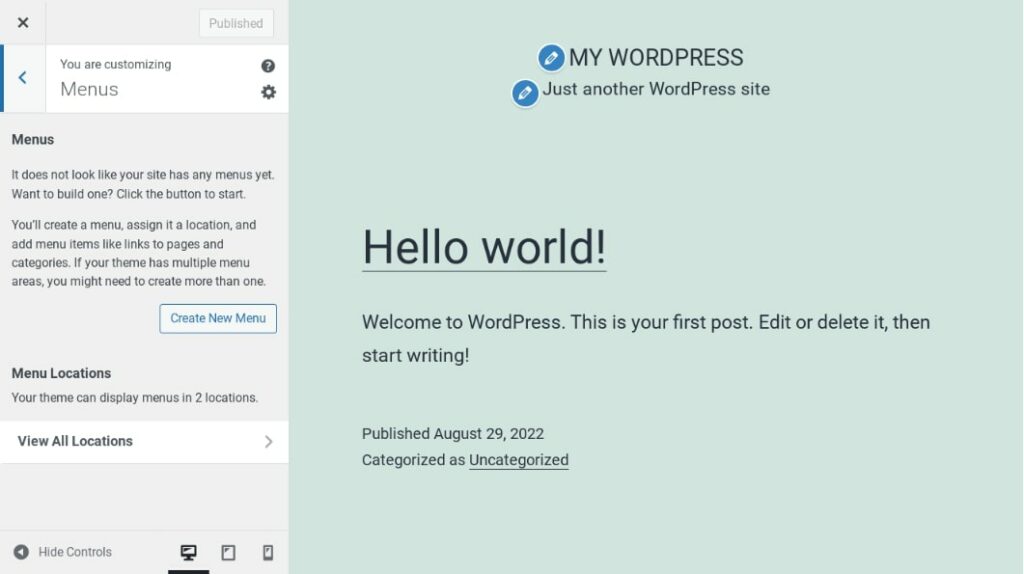
If you don’t have a menu set up yet, you can simply select Create New Menu to get started. You’ll be given the option to name your menu and choose where it will appear:
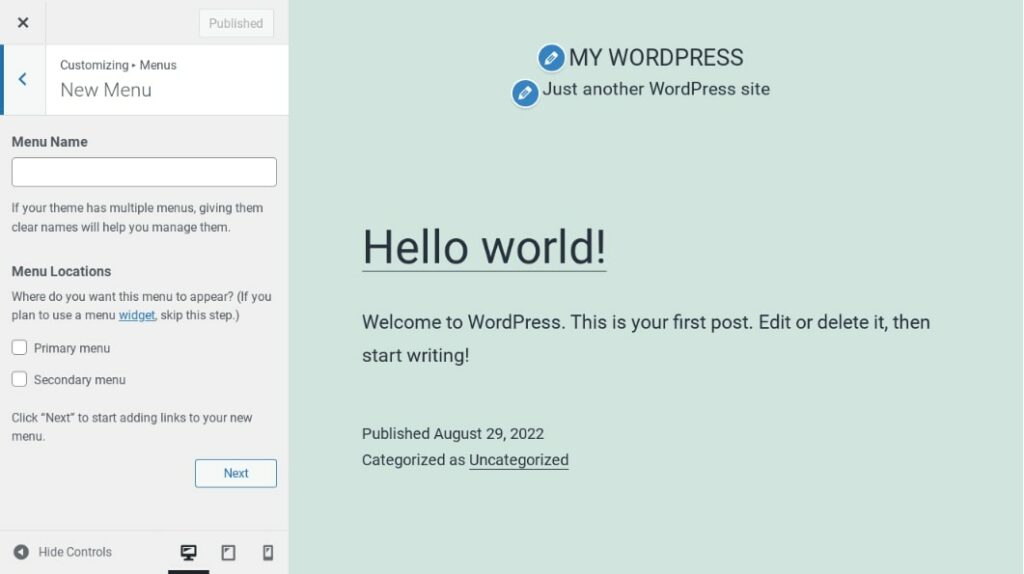
Keep in mind that the locations for your menu will vary depending on your theme. When you’ve made your choices, click on Next and select the Add Items button. Now, it’s time to start building your menu!
Step 2: Add Your Navigation Items
For each new menu you add to WordPress, you’ll be able to include any of your pages, posts, and other content. You’ll see each of your site’s elements separated into various sections, and they’re all selectable. Just click on an item to add it to your menu:
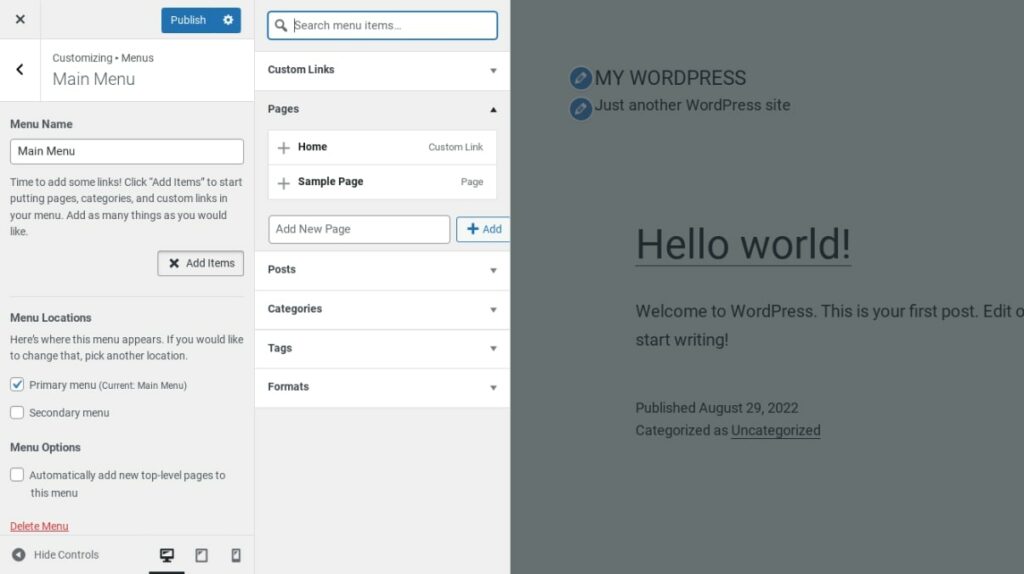
Each section covers a different item type, and each has its use:
- Pages: The backbone of most menus. These are your core, evergreen destinations, like Home, About, and Contact.
- Posts: Link directly to a specific article, such as a cornerstone guide you want every visitor to see.
- Categories: Link to an archive of related posts. This works well for blogs with clearly defined topics.
- Custom links: Point to any URL you type in, including external sites, such as a storefront or social profile.
Once selected, you’ll see the item show up in the left-hand column. If you make a mistake, you can select the red X icon to delete an entry. You can even create new content here and immediately add it to your menu. For example, to add a new page, you simply need to type a name for it in the box at the bottom of the Pages section, then select the Add button.
As you add items, you should see them appear on your site in the preview panel. This useful feature lets you see what your menu looks like as you’re building it. Once you’ve selected everything you want to include in your menu, it’s time to start organizing it.
Step 3: Organize Your Menu’s Structure
This is one of the easiest parts of setting up your WordPress menus. Organizing your menu items is as simple as dragging and dropping them into place.
To do so, hover over any menu item you’ve added. You’ll see your cursor turn into a crosshair. From here, simply drag and drop the item up or down to reorder it:
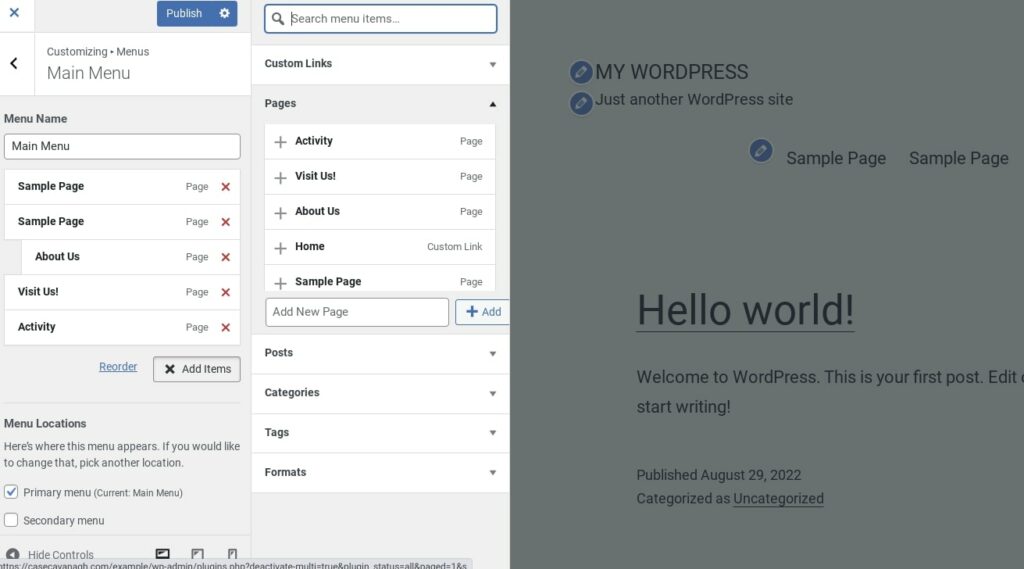
If you’d like to create a dropdown menu (a submenu that appears when visitors hover over a parent item), you can do that here as well. Just drag an item to the right, and it will automatically become a sub-element of the menu item right above it.
When you’re ready to move on, click on the Publish button at the top of the page to preserve your changes. Alternatively, you can select Save Draft or Schedule if you don’t want your new menu implemented quite yet.
One heads-up for later: if you ever switch themes, your saved menus stick around, but their location assignments reset. You’ll need to reassign each menu to the new theme’s locations (or select it in a Navigation block if your new theme is a block theme).
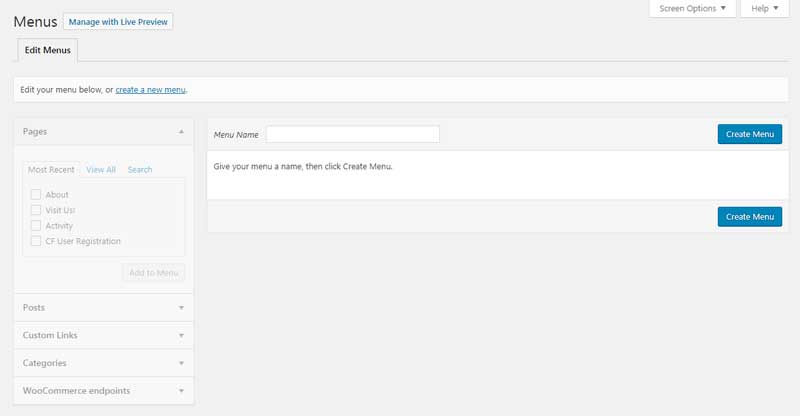
On classic themes, the Live Customizer lets you preview your menu while you build it, which is why we used it for the steps above. It’s also worth noting that you can create menus through a similar process in the Appearance > Menus section of your dashboard, which is available on classic and hybrid themes:
If you’re good with code, you can also use CSS to restyle your menu, or use your theme’s PHP hooks and filters to change where it renders. If you go down this route, however, you’ll want to follow your theme’s documentation to avoid issues with your site’s layout.
How to add a menu to your footer or sidebar
If you’d like to include additional menus elsewhere on your site (within your footer, for example), WordPress gives you a way to do it on both theme types.
On a block theme: add a Navigation block to a template part
Open Appearance > Editor and edit the template part where you want the menu to live, such as your footer. Click the + block inserter and add a Navigation block. From the block’s settings, you can select an existing menu using the Menu options button or create a new one from scratch. Click Save, and the menu will show up everywhere that template part is used.
On a classic theme: use the Navigation Menu widget
Classic themes handle this with widgets. To add menus to these areas, you’ll need to return to Appearance > Customize in WordPress. This time, you’ll want to visit the Widgets section:
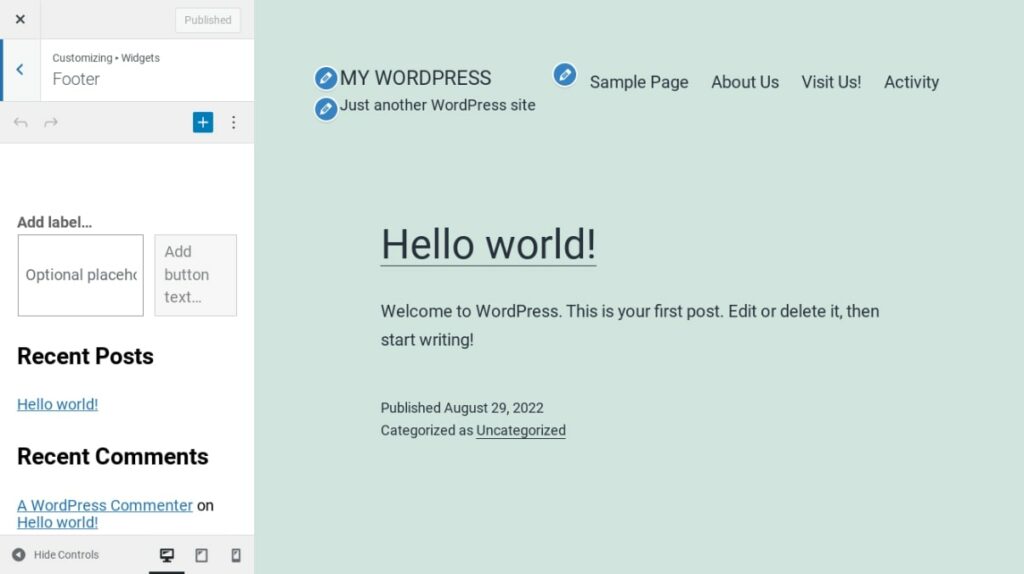
Here, you’ll see a list of preset widget areas, which will vary depending on your theme, but they’re usually located in your sidebars and/or footer. Choose the area where you want your menu to be placed, and you’ll be presented with a number of widget options.
To add a new widget, you’ll want to search for one called Navigation Menu. If it isn’t already in place, you can select Add a Widget, search for it, then click to add it to your widget area:
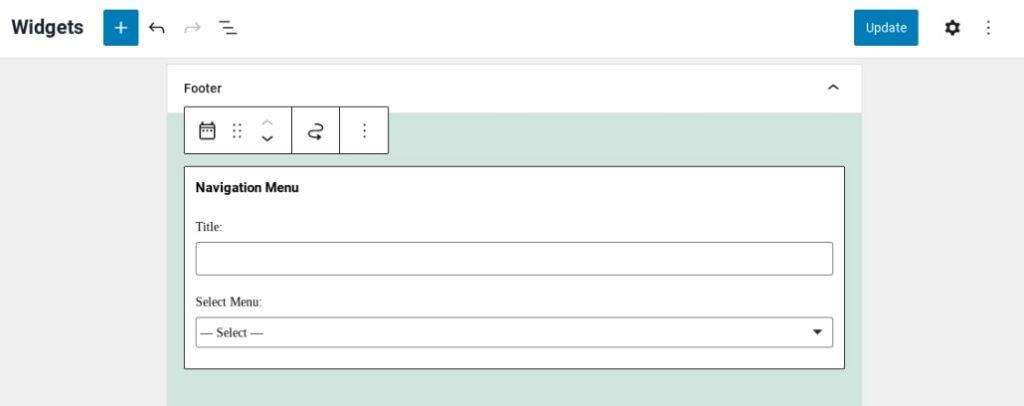
Next, expand the widget by clicking on it. You’ll get the chance to add a title (which is optional), and also select the menu you’d like to display. If you haven’t created any menus yet, you’ll be given the option to do so now. Widgets provide you with yet another way to display menus on your website and will be especially helpful if you’re short of suitable locations within your chosen theme.
WordPress menu FAQs
How do you add a dropdown menu in WordPress?
On a classic theme, drag a menu item slightly to the right in the menu editor; it becomes a submenu of the item above it. On a block theme, select an item in the Navigation block and click Add submenu in its toolbar.
Where is the menu editor in WordPress?
It depends on your theme. On block themes, go to Appearance > Editor and select Navigation. On classic themes, go to Appearance > Menus, or Appearance > Customize > Menus for a live preview.
Why is there no Menus option under Appearance?
You’re using a block theme. Since WordPress 6.0, block themes manage navigation with the Navigation block in the Site Editor, so the Menus and Customize screens are hidden. Go to Appearance > Editor instead.
What is a menu in WordPress?
A menu is a set of navigation links, usually in your site’s header or footer, pointing to pages, posts, categories, or custom URLs. Most sites have one main menu; many themes also support secondary or footer menus.
Do menus carry over when I switch themes?
Your saved menus stay in the database, but their location assignments reset. After switching, reassign each menu to the new theme’s menu locations, or select it in a Navigation block if your new theme is a block theme.
Create Your First WordPress Menu Today
When it comes to creating a great UX, easy-to-follow navigation should be one of your highest priorities. Just as importantly, your search engine rankings also benefit from well-organized content that’s easy for readers to find.
Fortunately, WordPress makes it super easy to add menus to your site. You can select the items you want to display, re-arrange their order, and choose a location for your menu.

Do More with DreamPress
DreamPress plans include 1-click staging, a free Bunny CDN, daily backups stored offsite, and 24/7 support from WordPress experts.
Check Out Plans