
To install a WordPress theme, go to Appearance > Themes in your dashboard and click Add New Theme. From there, either search the free WordPress Theme Directory and click Install, or click Upload Theme to add a purchased theme’s .zip file. Then click Activate to put it live. Below, we’ll cover what to do before you install, three ways to install a theme (including a fallback for when the upload fails), and how to switch themes safely.
We’ve written previous guides on the topic of what WordPress themes are and how to find them. However, there’s one more crucial step to take. Once you’ve located the perfect theme for your site, you’ll need to get it up and running.
Fortunately, this couldn’t be easier to do. Installing and activating a new theme in WordPress is simple, whether you got it from the official directory or some other source. Plus, you can change themes whenever you’d like with the press of a button.
What to do before installing your WordPress theme
Installing a theme in WordPress isn’t difficult, and we’ll discuss how to do that in a moment. First, however, let’s talk about what to do beforehand. There are a few things you might need to do in preparation for adding your new theme.
For example, you’ll want to:
- Make sure you’ve thoroughly vetted the theme, which includes checking out its ratings and reviews. Also, take a look at how frequently it’s updated by the developer.
- If the theme has a demo available, try it out to see if you like its appearance and features. You can also check how a theme will look with your content after installation, which we’ll discuss later.
- Consider creating a staging site to test out the theme before adding it to your live site (on DreamPress plans, staging is a built-in, 1-click feature). This is a particularly important step if you’re switching themes on an already established site. You can see exactly how it will look and find out if it causes any compatibility issues or other problems.
- If you’re setting up a new WordPress site, make sure you’ve covered all the necessary tasks to get it up and running. These include signing up for a domain and choosing a quality WordPress hosting plan. DreamHost WordPress hosting plans include the latest version of WordPress, ready to install from the DreamHost control panel, so a brand-new site is theme-ready right away.
Once you’ve taken care of the above tasks — or however many of them apply to your site — you’ll be ready to install your new WordPress theme. There are a few ways to do this, so we’ll talk about each one in turn.
How to install a WordPress theme (3 methods)
Before we show you how to install a theme, there’s one more crucial thing to do first. If you’re changing themes on a site that already has content, you’ll want to make sure you have a recent backup in place. This will be essential for restoring your site in case the new theme causes any problems — especially if you aren’t using a staging site to test it.
1. Install a free theme from the WordPress Theme Directory
Let’s start with the easiest of the three installation methods. If you aren’t familiar with the WordPress Theme Directory, this is one of the best places to find themes for your site. Everything listed here is free — more than 15,000 themes, per WordPress.org’s own count — and each one has been vetted by a volunteer review team before it’s listed. What’s more, you can install a theme from the directory without leaving your WordPress dashboard.
To get started, visit your site and navigate to Appearance > Themes. Then click on the Add New Theme button (on WordPress versions older than 6.4, it’s labeled Add New):
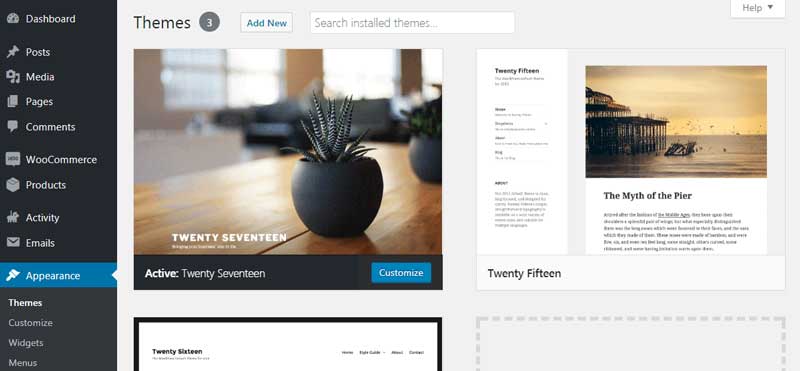
You’ll be presented with a searchable version of the Theme Directory. Type a theme’s name into the search box if you already know it, browse the Popular and Latest tabs, or use the Feature Filter to narrow the list by layout, features, and subject.
Once you know which theme you want, hover over its image and click on the Install button:
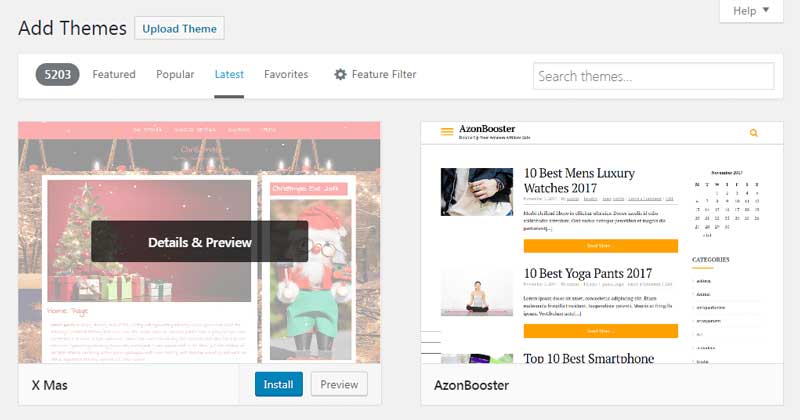
WordPress will spend a few moments installing the theme. Then you’ll be given a few follow-up options:
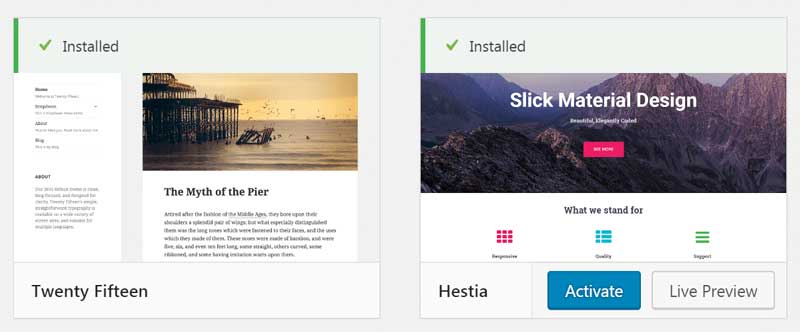
If it’s a classic theme, you can click on Live Preview to see what your site will look like using it. Block themes are the exception: WordPress.org’s documentation notes that the Live Preview option is removed for block themes, so test one on a staging site, or activate it and fine-tune it in the Site Editor. Meanwhile, clicking on the Activate button will switch your site to the new theme immediately. That’s all you need to do!
2. Install a purchased (premium) WordPress theme by uploading its .zip file
How do you install a purchased WordPress theme? Download its .zip file from the marketplace or developer, go to Appearance > Themes > Add New Theme > Upload Theme in your WordPress dashboard, choose the file, and click Install Now, then Activate. If you’ve bought a premium theme from another directory or a developer’s website, you won’t be able to install it using the directory method above — this upload method is the one to use.
The theme should have been provided to you as a .zip file, which you can upload directly to your site. If you don’t know where to find that file, contact the theme’s developer and they should be able to help you out.
One check before you upload: marketplaces often deliver a purchase as a larger package that bundles documentation and license details alongside the theme itself. Envato’s install guide (June 2026), for example, tells buyers to choose the installable theme file specifically. If that’s your situation, unzip the package on your computer first and upload only the theme’s own .zip inside it.
Once you have the theme’s .zip file saved to your computer, go to your WordPress dashboard. Navigate to Appearance > Themes and click on Add New Theme. This time, however, you’ll want to click on the Upload Theme button at the top of the page:
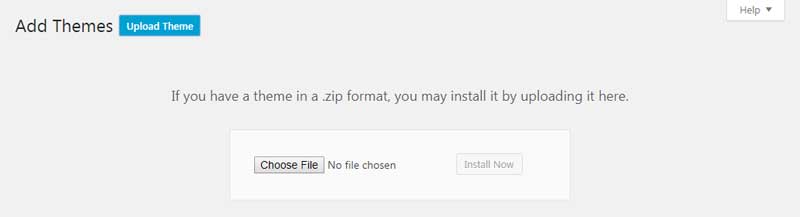
Next, select Choose File. Then select the theme’s file on your computer and click on Install Now. WordPress will display a success message when the theme installation is complete:
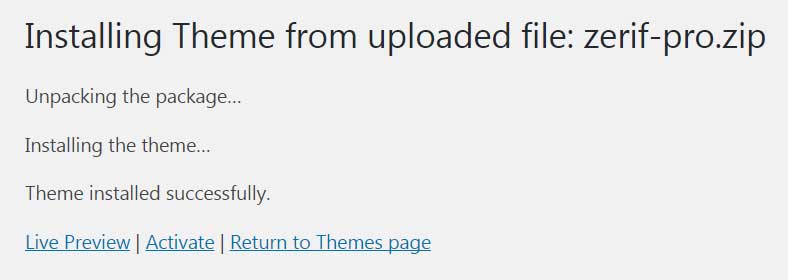
As before, you can preview a classic theme with Live Preview or hit Activate to make it official. (Block themes don’t offer Live Preview, so activate yours and fine-tune it in the Site Editor, or test it on a staging site first.)
If the installation fails instead, two common causes are:
- You uploaded the wrong .zip. If WordPress reports that the theme is missing its style.css stylesheet, you’ve most likely uploaded the full marketplace package rather than the installable theme file inside it. Unzip the package and upload the theme’s own .zip.
- The file is bigger than your upload limit. Some premium themes exceed the maximum upload size your hosting plan allows. Ask your host to raise the limit, or skip the dashboard entirely and use the SFTP method below.
Purchased themes also tend to have a few setup steps after activation that free themes don’t. Check the theme’s documentation or welcome screen for prompts to enter the license or purchase key from your order, install any required companion plugins, and (optionally) import demo content so your site starts out looking like the theme’s demo.
Finally, if your purchase includes both a parent theme and a child theme, install both using the steps above and activate the child theme. As WordPress.org’s Theme Handbook explains, child themes “allow parent themes to be updated without losing your modifications.”
3. Install a theme manually via SFTP or File Manager
When the dashboard upload won’t cooperate, there’s a reliable fallback: place the theme’s folder directly into your site’s /wp-content/themes/ directory. WordPress.org’s documentation lists this manual method right alongside the dashboard installer. Here’s how it works:
- Unzip the theme’s .zip file on your computer so you’re left with the theme’s folder.
- Connect to your server with an SFTP client or your host’s file manager. You’ll find your SFTP credentials in your hosting control panel.
- Upload the entire theme folder into /wp-content/themes/.
- Back in your dashboard, go to Appearance > Themes. Your new theme will appear in the list, ready for you to click Activate.
How to change your current WordPress theme
If you have several WordPress themes already installed (using the above methods), you may want to know how to switch back and forth between them. This is very simple.
Just go to Appearance > Themes to view your current list of options. Then, click on whichever theme you’d like to use and select Activate:
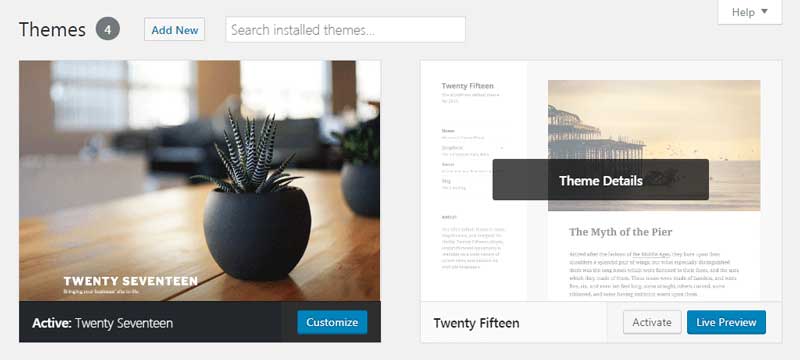
That’s all you need to do to change themes! Don’t forget that with a classic theme, you can use the Live Preview link to see what your site will look like before activating it. Block themes skip Live Preview, so if you want to test one before switching, use a staging site.
What actually carries over when you switch? Your content does. Per WordPress.org’s documentation, a theme changes how your site is displayed, not the underlying content — so posts, pages, and media stay put. Settings tied to the old theme don’t. After switching, recheck your menus, widget areas, and homepage settings, since those are configured per theme, and features specific to the old theme (such as its shortcodes) may stop displaying until you replace them.
Every time you switch themes, it’s worth checking to see if there are new settings you need to configure. Take a look at any new tabs or sections added by the theme, as well as at its main settings screen — the Site Editor (Appearance > Editor) for block themes, or the Customizer (Appearance > Customize) for classic themes — and make sure you have everything set up the way you’d like. If you run into any trouble, most WordPress themes come with documentation and forums where you can find help.
Two housekeeping habits worth keeping: update the themes you keep, and delete the ones you don’t. WordPress flags installed themes with updates available right on the Themes screen (or under Dashboard > Updates), and you can remove an unused theme by opening its details window and clicking Delete. Just remember that deleting removes the theme’s files completely, including any customizations you made to it, so take a backup first.
Block themes vs. classic themes: what changes after you activate
Which kind of theme you installed determines where you’ll customize it. A block theme uses blocks for every part of your site — header, navigation, content, and footer — and you edit all of it in the Site Editor (Appearance > Editor). Per WordPress.org’s documentation, block themes don’t offer the Customizer at all, since they “rely on the Site Editor to edit all parts of your site.” Classic themes work the other way around: you’ll customize them under Appearance > Customize.
Every WordPress default theme since Twenty Twenty-Two — the first default block theme — has been a block theme, including recent defaults like Twenty Twenty-Five. So if you activate a theme and can’t find the Customizer in your menu, that’s not a bug. You’re simply running a block theme, and the Site Editor is where everything lives.
Install your new theme today
Adding a theme to your WordPress website is exciting. You’ll get a brand new look, plenty of options to play with, and elements to personalize. Of course, to get there, you’ll first need to know how to install and activate your theme.
FAQs about installing WordPress themes
How do I install a purchased WordPress theme?
Download the installable .zip file from the marketplace or developer, then go to Appearance > Themes > Add New Theme > Upload Theme in your WordPress dashboard. Choose the file, click Install Now, then Activate. Afterward, check the theme’s docs for a license key or required plugins.
Why won’t my theme .zip file upload?
Usually you’ve uploaded the full marketplace package instead of the installable theme .zip inside it (WordPress reports a missing style.css stylesheet), or the file exceeds your host’s upload limit. Unzip the package and upload the theme’s own .zip, or install it manually via SFTP.
Does installing a new theme delete my content?
No. Themes control how your site looks, not what’s in it, so your posts, pages, and media stay in your database. After switching themes, recheck your menus, widget areas, and homepage settings, since those are configured per theme and may need to be reassigned.
How do I switch back to my old theme?
Go to Appearance > Themes, hover over your previous theme, and click Activate. As long as you haven’t deleted it, the theme is still installed, and your site switches back immediately.
Can I preview a theme before activating it?
For classic themes, yes: hover over the theme on the Appearance > Themes screen and click Live Preview. Block themes don’t offer Live Preview, per WordPress.org, so test them on a staging site instead. For themes you haven’t installed yet, most developers host a demo.

Do More with DreamPress
DreamPress managed WordPress hosting includes 1-click staging to test themes safely, a free Essential CDN, daily backups stored offsite, and 24/7 support from WordPress experts.
Check Out Plans