To install WordPress manually, you do 5 things: create a MySQL database and user, add those credentials to the wp-config.php file, upload the WordPress files to your server with an FTP client, run the install script at yourdomain.com/wp-admin/install.php, and set up your admin account. That’s the whole job. WordPress’s own documentation says that under most circumstances, installing WordPress “takes less than five minutes to complete” — though it’s smart to budget extra time for your first run.
WordPress is the most-used Content Management System (CMS) on the web — as of August 2026, W3Techs measures it on 40.7% of all websites, which works out to a 59.0% share of the CMS market. By choosing it to build your site, you’re joining a thriving community of users and developers. However, if you’ve never installed WordPress before, you may be unsure of the process and how to get everything working.
Fortunately, all you need is a clear plan and a bit of patience. Performing a manual installation will likely take more time than the one-click method. However, by the time you’re done, you’ll have a stronger understanding of what makes the platform tick, as well as valuable knowledge that you can use in the future. In this post, we’ll tell you what tools you’ll need and walk you through the installation process step by step. Let’s dive in.
How DreamHost Simplifies Installing WordPress
Manually installing WordPress isn’t too difficult, but it can trip you up if you come across an unfamiliar aspect of the platform. We’ll discuss why and how to perform this kind of installation in a moment, but we would be remiss if we didn’t first tell you how you can avoid it altogether.
Instead of installing WordPress on your own, you can often perform this task through your hosting service. If that service is optimized for WordPress, you may be offered features that dramatically simplify the process — or skip it entirely.
At DreamHost, it works like this: with DreamPress, our managed WordPress hosting, WordPress comes pre-installed and optimized the moment you choose a plan — there’s nothing to install at all. On Web Hosting, Managed VPS, and Dedicated plans, the WordPress Install Assistant in the DreamHost panel walks you through the setup in minutes, no database wrangling required.
However, if you don’t have access to a one-click installation option, or you simply want to know how to install WordPress manually, read on to learn about everything that’s involved.
When Should You Manually Install WordPress
As we’ve discussed, a hosting plan such as DreamPress removes the need to install WordPress at all. However, there are also reasons you may want to perform a manual installation.
For starters, a manual install gives you an opportunity to learn the ins and outs of how the platform works under the hood. This gives you extra insight when it comes to troubleshooting and dealing with any issues that may arise, along with a way to become more confident with WordPress and its customization.
You’ll also be able to parlay that knowledge into creating a local installation using a tool such as XAMPP — a free Apache distribution that bundles MariaDB, PHP, and Perl into one install. This is a great way to test your site before you display it to the public.
The Tools You’ll Need to Manually Install WordPress
Before diving into the process, there are a few tools you’ll need to install WordPress manually. In addition to a hosting provider that enables you to create databases and users, you’ll also need:
- A File Transfer Protocol (FTP) client. We recommend FileZilla, a free, open-source, cross-platform client that supports encrypted transfers over FTPS and SFTP.
- The latest version of WordPress. You’ll want to download this from the WordPress.org website. As we write this, that’s WordPress 7.1, and WordPress.org recommends PHP 8.3 or greater and MySQL 8.0 or MariaDB 10.11 or greater to run it.
- A dedicated coding text editor. This is optional, given that every Operating System (OS) includes a standard solution.
On this last point, while you’ll likely be able to edit text files directly via your hosting account panel, we recommend using FTP.
And while you can edit files using any text editor, an open source code editor such as Visual Studio Code can offer you more flexibility and other features to help make life easier down the line.
How to Manually Install WordPress (In 5 Steps)
With your tools in place, you’re ready to start manually installing WordPress, beginning with setting up a database and admin user.
Step 1: Create a New WordPress Database and User
Full disclosure here: This can sometimes be the most confusing step, as it involves a lot of detail. Not only are we going to create a database and an associated user account, but we’ll also refer back to them later when configuring your wp-config.php file.
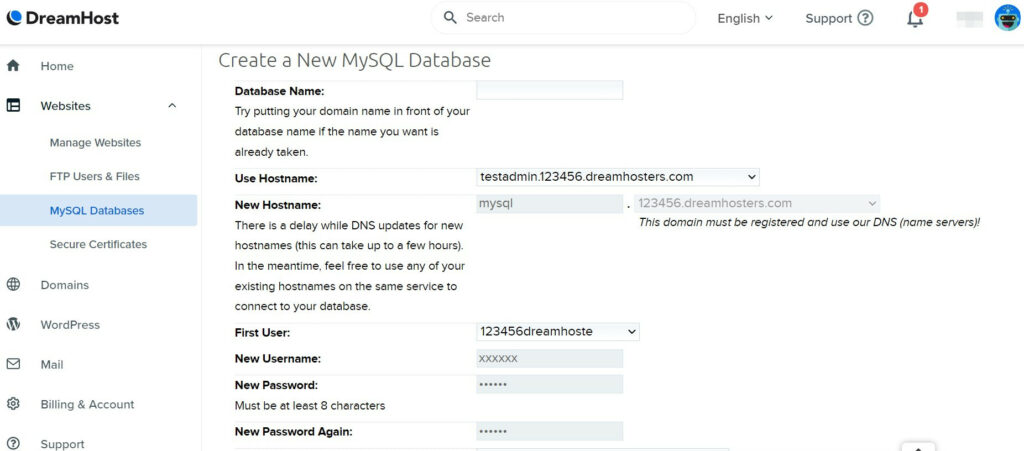
In your hosting panel, create a MySQL database and a database user. Assign that user all privileges for the new database, then save the database name, username, password, and database hostname for Step 2. Panel layouts vary by host and change over time, so consult your host’s current database documentation if you cannot find these controls.
Under the Create a new MySQL database section, fill out each field accordingly. When creating a new user, it’s important to choose a strong, hard-to-guess password — we recommend using a dedicated password generator. Note your credentials for later use, and click Add new database now!
Finally, you’ll need to set up privileges for your user account. Since you’re the administrator, you’ll need complete access. To do this, go to the MySQL Databases screen, find your database at the top, and click the user you just created under the Users Access column:
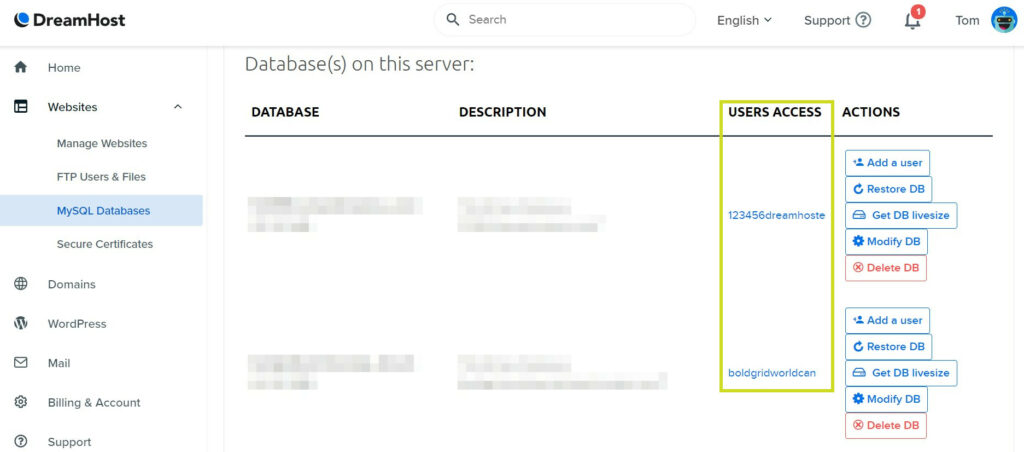
Here, simply tick all of the boxes under the What may users do to tables in these databases? section, and save your changes. Your database should now be ready to use! The next step is to access it via WordPress.
Step 2: Configure WordPress’ wp-config.php File
In this step, we need to tell WordPress where your database is and how to access it using the wp-config.php file. In a nutshell, this file tells WordPress where to find every element of your site in the database. As you can imagine, it’s a key WordPress core file.
Quick reassurance before you open a code editor: this step is technically optional. If WordPress can’t find a wp-config.php file when you run the install script later, it will offer to create one for you and ask for your database details then. We still recommend doing it yourself — it’s the best way to learn how WordPress talks to its database, and that knowledge pays off when you’re troubleshooting later.
To get started, navigate to your downloaded WordPress folder, and unzip it. Inside, you’ll find the wp-config-sample.php file. You’ll need to open it and find the following code:
// ** MySQL settings - You can get this info from your web host ** //

/** The name of the database for WordPress */
define('DB_NAME', 'database_name_here');
/** MySQL database username */
define('DB_USER', 'username_here'); /** MySQL database password */
define('DB_PASSWORD', 'password_here'); /** MySQL hostname */
define('DB_HOST', 'mysql.example.com'); You’ll need to replace the placeholders in each relevant define function with the database information from the previous step, specifically:
- database_name_here (including the prefix and underscore outlined in the last step).
- username_here (again, including the prefix and underscore).
- password_here.
- mysql.example.com (replace this with the database hostname supplied by your hosting provider; DreamHost users can find or create the required MySQL hostname in the panel).
Finally, save your changes, then rename the file itself to wp-config.php. It’s now time to upload WordPress to your server.
Step 3: Upload Your WordPress Files to Your Server
This step is arguably the easiest to achieve. Retrieve your FTP or SFTP credentials from your hosting panel, then use them to connect to your server in FileZilla. Once you’re there, open the document root assigned to the domain where you want WordPress installed. Directory names vary by host, so confirm the correct web directory in your hosting panel or host documentation before uploading.
You could install WordPress into a subdirectory (particularly if you’ve already got a website up and running). However, for this example, we’re using a clean server. To do this, simply navigate to your local WordPress folder in the left-hand panel of FileZilla, copy all of the files within, and drag them to your root folder.
Now that your files are uploaded and your database is set up, the penultimate step is to install and set up WordPress itself.
Step 4: Run WordPress’ Installation Script
Once the previous steps are completed, it’s time to run the script that will complete your WordPress installation. To begin, navigate to yourdomain.com/wp-admin/install.php, replacing the placeholder domain with that of your site. (If you installed WordPress into a subdirectory, add that directory to the URL — yourdomain.com/blog/wp-admin/install.php, for example.)
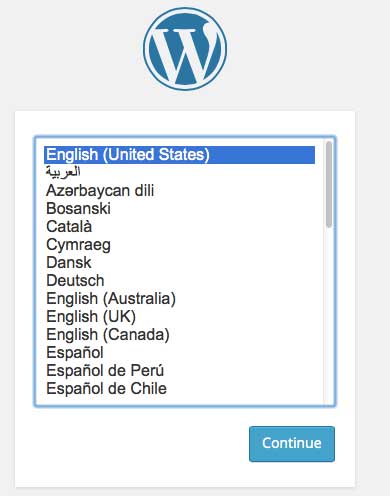
You should see a prompt asking you to choose a language for your WordPress installation, which you should do before clicking Continue:
The next screen enables you to name your site and add a WordPress admin username, password, and email address. When creating your username, it’s important to make sure it’s secure. If nothing else, choose a different name than simply admin — and also generate a complex password.
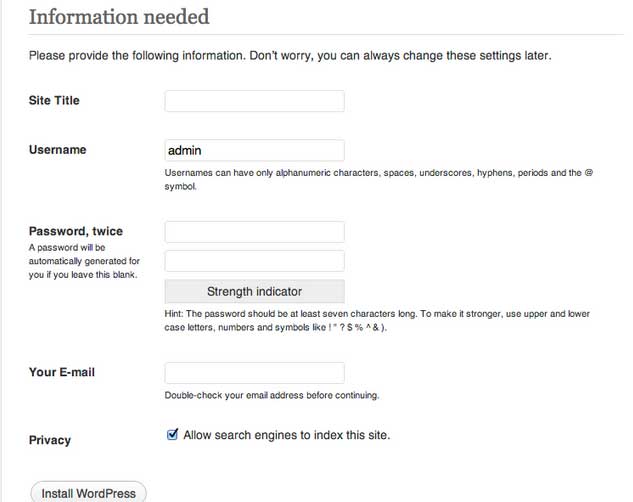
This screen also includes a search engine visibility checkbox. Tick it if you want to ask search engines to stay away while you’re still building the site; leave it unticked if you want the site visible to everyone right away. Either way, you can change this setting later from your WordPress dashboard. When you’re finished, click Install WordPress.
Step 5: Log In and Choose Your Next Steps
Once WordPress is installed, you’ll be brought to the WordPress dashboard. If not, you’ll want to work through some of the common installation problems and consult your host if you run into difficulty.
At this point, you’ll likely be wondering what to do next. Here’s what we recommend:
- Choose a suitable theme. In short, this governs how your site looks on the ‘front end’.
- Install some essential plugins. These add-ons extend WordPress’ functionality, and some are crucial for protecting your site and users.
- Get writing. You’ll now want to create any pages and posts you’ll need — this is the fun part!
Our advice is to immerse yourself within WordPress by reading as much content about the platform as possible. Our blog is a great place to start, but there is a wealth of available information on WordPress and its workings. For example, the official WordPress documentation will be key in developing your expertise.
FAQs About Installing WordPress Manually
How long does it take to install WordPress manually?
According to WordPress’s official documentation, installing WordPress “takes less than five minutes to complete” under most circumstances. If it’s your first manual install, give yourself extra time for the setup work around it — creating the database, editing wp-config.php, and uploading files over FTP.
Do I have to edit wp-config.php myself?
No. If WordPress can’t find a wp-config.php file when you run the install script, it will ask for your database details and offer to create the file for you. Editing it yourself is still worth doing at least once — it teaches you exactly how WordPress connects to its database, which makes future troubleshooting much easier.
Can I install WordPress locally on my computer?
Yes. Install a local server environment such as XAMPP, which packages Apache, MariaDB, PHP, and Perl for Windows, Linux, and OS X. Then follow the same steps in this guide: create a database, configure wp-config.php, place the WordPress files in your local web directory, and run the install script in your browser. It’s a great sandbox for testing before going live.
How do I manually install a WordPress plugin or theme?
The easiest way is through your dashboard: upload the plugin’s zip file under Plugins > Add New, or the theme’s zip file under Appearance > Themes > Add New. If your server doesn’t allow that, you can do it the fully manual way — extract the zip file and transfer the folder to wp-content/plugins (for plugins) or wp-content/themes (for themes) via your FTP client, then activate it from your dashboard.
Is a manual installation better than a one-click installation?
Not better — just more educational. The end result is the same WordPress site either way. Install manually when you want to understand the platform’s plumbing or need a custom setup; use an installer (or a host that pre-installs WordPress, such as DreamPress) when you just want to get building.
Install WordPress Easily
Understanding how to manually install WordPress gives you an advantage when building a successful site. You can see exactly how your website interacts with the database, as well as how your files and their permissions work. You can also learn to troubleshoot issues at the source while gaining a skill set that will enable you to confidently build future sites.

Skip the Manual Install
DreamPress comes with WordPress pre-installed and optimized, plus daily backups, 1-click staging, and 24/7 support from WordPress experts.
Check Out Plans